Ridge Zones
A mini-guide to Bridger's expert terrain.
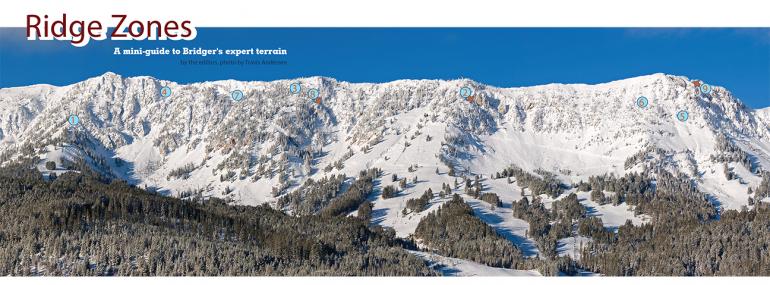
It’s a powder day at Bridger and you’re craving the white like Pacino in Scarface. Where do you go? Here are nine tried-and-true Ridge zones: three for Ridge freshmen, three for the upperclassmen, and three for master’s candidates only.
Keep in mind that these designations are for first-time Ridge users looking for a challenge—all of the terrain on the Ridge is experts-only. Heed all ski patrol warnings, ski with a partner, carry avalanche gear, and know how to use it.
First-Timers
1. The Fingers. Often overlooked, the Fingers are accessed just above Pierre’s Knob chairlift and they’re perfect for a first-time hike or a quick shot before class. The climb is usually crowd-free and the zone is a good warmup for some of the burlier runs off the Ridge. Numbered 1-4, the runs get steeper and longer the higher you climb, but even if the 4th Finger is your destination, the hike shouldn’t take more than 20 minutes and all the runs are relatively low-consequence in the event of a fall—save any emotional damage from the gawking hordes above the South Bowl.
2. Madman’s. Another great option for first-time hikers is Madman’s. Access the line from the main Ridge hike, but about halfway up, cut under the Poma lift and you’ll find a tight chute below a towering cliff face. The entrance is the hardest part, but once you commit to the run, you’ll be rewarded by an open bowl below. This is a great way to add some vertical to North Bowl and another line that’s often overlooked but definitely worth your while.
3. The Nose. From the top of the main Ridge hike, head south for about 20 minutes until you reach a patrol shack and a flat stretch. Unless you’re the first person on the Ridge that day, there will be tracks and probably other people gearing up. Dropping down along the spine of the Nose, the pitch is mellow and there are no make-or-break obstacles—but wander too far astray and you may end up in a hairy situation. Once the High Traverse cuts across your line, hang a left into Exit Chute.
Upperclassmen
4. Z-Chute. The hardest thing about Z-Chute is getting there—it’s one of the furthest from the top of the traditional Ridge hike. Most people now access the chute from the Schlasman’s lift—hike north along the Ridge to a high point and patrol shack. Continue north past Morning Glory bowl and you’re at the top of Z-Chute. There’s a choke in the middle that can be rocky, so don’t bomb in out of control.
5. Bridger Gully. Like Z-Chute, Bridger Gully gets its rating based more on the approach than the actual run, and while the approach is as straightforward as a long walk along the Ridge, it can get tricky depending on where you choose to drop in. Skiers can walk north along the Ridge until they reach an obvious traverse—round the corner and drop into the open bowl below. It’s easier for snowboarders to continue along the Ridge to a point above two prominent rock outcroppings. Drop from here to avoid a painful traverse and enjoy a bit more vertical.
6. The Ohs. Hike north from the top of the main Ridge hike until you reach the traverse. Continue on the traverse until just before it turns the corner and drops into Bridger Gully. Drop in and ride the shoulder to the south of Bridger Gully, keeping a look-out for short drops and other small obstacles. You should end up just above the top of the Powder Park chair.
Graduates
7. Colter’s. One of Bridger’s most aesthetic walled-in couloirs, Colter’s is steep, protected, and often super deep, and feels tighter than it really is—hero stuff. From the top of the Ridge hike, head south past the Nose to a broad open bowl that clearly steepens and narrows. This is your shot. If you misjudge where you are, you could end up in some serious terrain, so be careful and err north if you’re uncertain—it’s better than too far south.
8. Northwest Direct. The hike to Northwest Direct is the longest on the Ridge unless you’re headed out of bounds, and while it’s mellow the whole way, figure on an hour at least. The entrance to Northwest is no picnic, and due to its steepness, much of the snow gets pushed off the first section after the first few descents. There’s a mandatory air that shrinks as the snow piles up, but can be sizeable early in the season or on low-snow years. Once you’re through the puckering first couple hundred feet, open ‘er up and enjoy steep, deep turns through the open apron below. Boarders, maintain speed as the traverse back can get pretty flat and slow.
9. Super Couloir. Like many lines on the Ridge, the hardest part about Super can be finding it. From the knob on top of the Nose, ride the fall-line until you reach some tight trees. Head left and the entrance is obvious once you find it. After some jump turns through a narrow stretch at the top of the couloir, the chute opens up and follows the fall-line.
Adapted from the Ridge’s definitive guide Stepping Up by Tavis Campbell and Sam Cox. Get your copy at stepping-up.net or ski shops around town.

