Deep Thoughts
Flat-light photo tips.
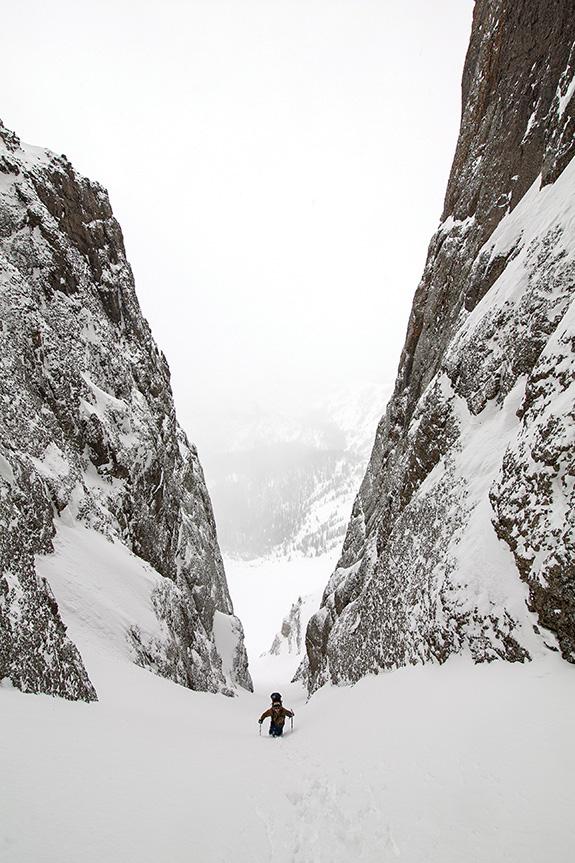
Outdoor photography in the flat light of winter can make a vertical world look, well, flat. Here in southwest Montana, we don’t see a great deal of sunshine during the winter months, but we can’t always leave our cameras at home just because it’s overcast. Flat light is lighting that has no particular direction to it, and produces minimal contrast between the highlights and shadows in a setting. This also occurs when the sun is at high noon. Flat light is not to be confused with soft light, when the transition from shadows to highlights is very gradual but not necessarily lacking in contrast or visual appeal. Photos captured with flat light lack depth despite having dynamic compositional elements, detracting from the intrigue of the image. By using elements of the landscape to your advantage, you can create depth and escape two-dimensionality.
First, add foreground objects. When an image has an object in the foreground, it serves as a focal point for the viewers. They’ll look at the foreground first, then their eyes will move to the rest of the photo. By giving viewers multiple things to look at, at multiple distances from the camera, the photographer can give the impression of depth.
It’s also important to observe the shapes of the landscape. Diagonal or leading lines in the foreground, shapes from the recession of mountains, or any visible shadows give a scene definition. Reflections in water add not only shapes but also different light tones. The path the viewer’s eyes follow through the photo is very important to how the image is perceived, so by using shapes and leading lines to guides their eyes, photographers can control that perception.
In flat-light photography, it’s vital to nail the exposure, as compensation in post-production will degrade image quality, add noise, and reduce sharpness. Find a balance of shutter speed, aperture, and ISO to maintain the highest image quality. Be aware of the ISO capabilities of your camera so you can let the most light in but avoid too much noise. As a general rule, consider anything over 1600 ISO risky territory for noise. A low-aperture setting (f/1.4-4) will allow more light into the camera, but means the plane of focus will be thin, so you either have to use the shallow focus to your advantage, or get farther away from the main subject to increase the depth of field. Shoot in RAW to capture all image data and give yourself more flexibility during post-production. Shooting in JPG saves space on your memory card but comes with a loss of information due to compression. A JPG takes a flat-light scene with minimal contrast and compresses it further.
Next, get high—or low, for that matter. Photographing from levels other than eye height and angles other than the ones we see on a daily basis makes for unique images and enhances the impression of depth. By including more of the ground, one can exaggerate the ratio of foreground to background. “Frame within a frame” is a phrase used in photography for photographing through a window or door to add depth. When outdoors, try using tree branches, rocks, fences, or openings in the forest to create the same impression. The frame doesn’t need to be complete; it could be trees or branches framing only two sides of the photo, similar to adding a foreground object. This will help to re-create the feeling of being there for the viewer.
These strategies often work well together—adding a foreground object and using a shallow depth of field, or using a low angle and adding a frame within a frame. While they can be effective on their own, using more than one in a photo will enhance a sense of depth. Practice these techniques to develop an eye for picking out stellar compositions and eventually, you’ll rid your portfolio of flat-light photographs.
Simon Peterson is the photo editor for Outside Bozeman.


