Pack in the Saddle
Planning your first overnight bike trip.
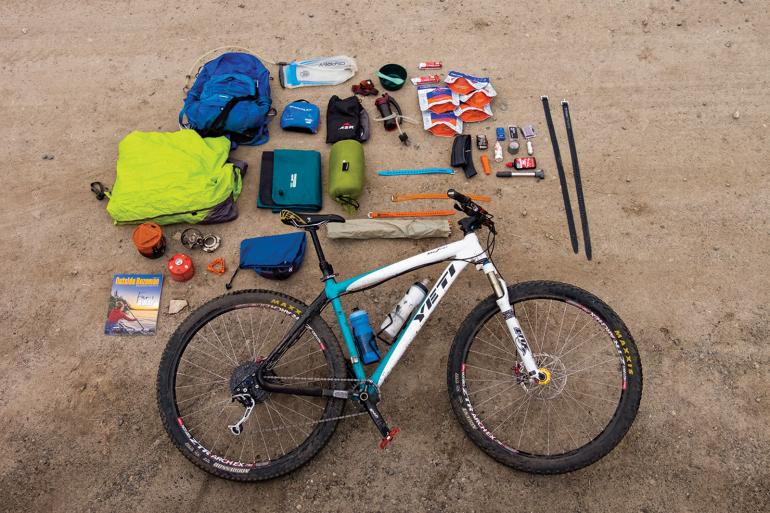
From an outside perspective, bikepacking can seem both intimidating and cost-prohibitive. Rather than spending your month’s rent on special racks, bags, and bikes, consider using what you already have or can easily afford. All you really need is a trusty second-hand bike, a few basic fasteners, camping gear, and a plan to make it happen. Most seasoned bikepackers aspire to be as lightweight as possible with all their supplies distributed evenly on their bikes. And it’s possible with some DIY rigging. The key to bikepacking is to balance riding comfort with camping comfort, which often contradict each other. Since everyone has different bikes and gear, make sure to test out load-distribution and stability on a trial ride close to home before heading out.
Basic Materials
Any entry-level bike
Small backpack with bladder (2-3L)
A couple water bottles
Titan/Voile straps, bungees, and paracord
Assorted stuff sacks (waterproof are ideal)
Standard camping gear, bike-maintenance equipment, and food
Some inspiration and creativity
Rigging
Saddle bag: A loaded stuff sack (bonus points if it’s waterproof) can be attached to the saddle rails under your bike seat using paracord and a large Titan/Voile strap. This is a great spot for a sleeping bag, pad, and a change of clothes. Something sturdy (camp sandals) to give the bag form is also a good idea. Don’t overload it, though, because if it’s too heavy it’ll move around and may rub on your tire.
Handlebar bag: This is a great place for your tent. Take a couple large straps and rig it up front—just make sure to not obstruct your shifting or braking mechanisms.
Top-tube bags: It’s standard practice to strap basic bike-maintenance gear to your top tube on the frame. Consider adding your tent poles if they’re too long for the handlebar bag.
Fork bags: If you’re bringing dehydrated meals (i.e., lighter), this can be a great spot for food. Strap your bag(s) securely with weight evenly distributed between them as to not pull your steering. The forks can also be used to hold extra water bottles. When rigging, make sure your gear is clear of the spokes.
Backpack: Anything you have left can go in here: camping supplies, first-aid kit, water bladder, food, etc. As you take more trips, you’ll figure out better ways to get gear off your back and onto your bike. You know you’ve mastered it when you can leave the backpack at home.
At a certain point, no amount of reading or research will fully prepare you. After all, adventures start when things go wrong. Be conservative, be prepared, and embrace whatever experience comes your way.

