Review: Booty Call

Surely you’ve been caught in the backcountry with foot and footwear issues, which is the last thing you need to contend with when trying to enjoy the outdoors. Getting properly fitted boots can help you overcome this.
The boot-fitting process can be summed up in three words: TAKE YOUR TIME! It is important to do your research, find a few boots that match your hiking style, then take the time to make comparisons among them. Trying too many boots on can confuse the process.
The first step is to have your foot measured with your favorite sock combination. Remember, stay away from cotton. Hiking socks by Smartwool, Bridgdale, and Lorpen are some of my favorites. Adjusting sock weight can also aid in “fine tuning” the fit of your boot.
Measuring the foot is a step that is often overlooked. The measurement is not a concrete number; it is simply a reference point to start from. We are not only concerned with the overall length, but also the volume. Foot profiles can be categorized as low, medium, or high volume. Therefore, we need to choose a boot with an internal shape that matches your foot’s shape.
To determine if your boots are the proper length, stand in the unlaced boot and tap your toes to the front so that they are just touching the boot tip. You should be able to slide your index finger down behind your heel into the boot. If this is the case, lace up the boot. It is important to lace the boot as firmly and evenly as possible.
Make sure the hardware on the boot does not lace too close or too far apart—this is the first sign that the boot does not fit. The laces will hold the foot in the heel pocket of the boot, not allowing it to slip to the front on the downhill. A hiking boot retailer will have an incline to check for proper fit. On the uphill, you should not have excessive heel slip. When descending with some force, your toes should not hit the front. Keep in mind that if your toes hit a little in the store, you can expect them to hit excessively on a long downhill.
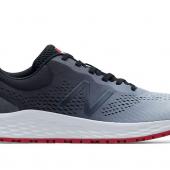
I am often asked, “How should a hiking boot fit?” To sum it up, you should have a snug fit from the ball of the foot to the heel, room in the toes, and no pressure points. It is common to think that one may get a blister from a shoe that is too loose, but it’s more common to get a blister from a shoe that’s too tight. If you’re at a crossroads with two sizes, go larger. Most stores do not mind if you wear the boot inside to ensure a proper fit. Use this to your advantage. Give ‘em a test drive!
Curt Smith is a boot fitter at Schnee’s Boots & Shoes in downtown Bozeman. He has been boot fitting for 14 years and has attended three Phil Oren Boot Fitting Seminars.
3/4-Length Performance Insole - Superfeet
Premium insoles are all the rage these days, and with good reason—recent advances in quality and selection mean just about anybody can afford greater foot comfort and less susceptibility to injury. As with most gear trends, I initially resisted; but eventually I joined the podiatric party and bought some Superfeet. I absolutely love them—and that means a lot coming from a guy who once removed the insoles of his army boots to make himself tougher. Superfeet has many different models to choose from, for a wide range of applications; I use the 3/4-Length Performance Insole, mainly for versatility. With this model I can use one pair of Superfeet in everything from ski boots to hockey skates to swing-dancing shoes and never have to worry about a bad fit. I use the Green variation, which is quite thick but gives me maximum support, balance, and shock absorption; other variations emphasize sensitivity and a light, streamlined fit. superfeet.com.
-Mike England